

Ankle sprains are one of the most common injuries in sports and fitness, but they can also occur during other activities. Sprained ankle are usually caused by a sudden movement or twisting motion that causes your foot to roll inwards, resulting in tears of ligaments on the outside of your ankle. Even though sprained ankles are quite common there is still misconception on the how it should be treated. That is why this article will provide you with information on how to treat sprained ankle the right way.
What Is A Sprain & What Causes Sprained Ankle?
A sprain is an injury that occurs when ligaments—the tough bands of tissue that connect bones together—are stretched or torn. In most cases, this happens when the foot is accelerated beyond its normal range of motion and cannot absorb the force through muscular contraction. This causes the ligament to stretch or tear, resulting in pain and swelling around the joint.
Sprains happen most often in sports that require quick stops or turns—such as basketball, football, soccer and tennis—or when an athlete lands awkwardly after jumping from high places (like a tree branch). Swelling typically begins within 30 minutes of injury and lasts for about two hours before subsiding for another hour or so before returning again for about another hour or two (this cycle repeats itself until healing takes place).
Sprained ankles are one of the most common injuries that occurs in sports. There are two main reasons for this. First, people tend to jump and land on their feet when they play sports like basketball and football, which puts tremendous pressure on the ligaments of the ankle. Second, athletes often wear shoes that do not provide enough support or cushioning for impact protection when landing from high heights such as jumping off a trampoline or diving into a pool while playing volleyball or swimming laps at the local gymnasium pool center.
You should see a doctor if you have severe pain and swelling, if you can’t walk on the affected leg without support, or if there is any deformity in the ankle joint. The doctor will assess your injury and determine if you need an X-ray or MRI scan to assess whether there is any damage to the bones surrounding your ankle joint.
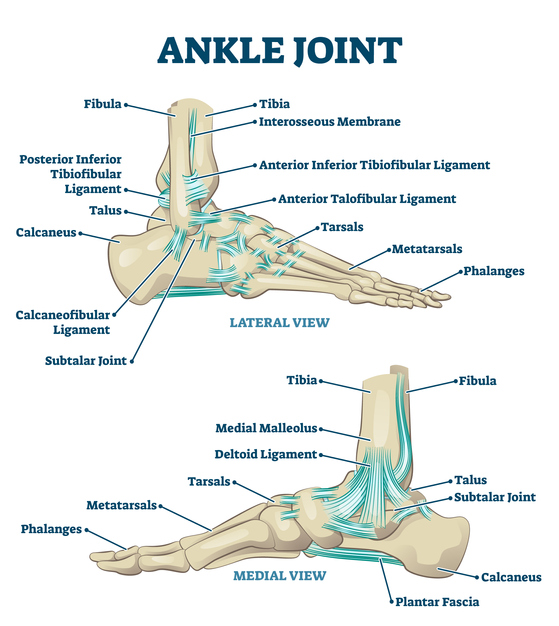
Sprained Ankle: Anatomy
Your ankle joint is formed by three bones—the tibia (shinbone), fibula (calf bone), and talus (anklebone). The main ligaments supporting this structure are called cruciate ligaments: anterior talofibular ligament (ATFL), posterior talofibular ligament (PTFL), calcaneofibular ligament (CFL) and deltoid ligament (DL). These four ligaments provide stability for motion in all directions at the ankle joint.
An inversion injury, often known as a lateral ankle sprain, is the most typical type of ankle sprain. The anterior talofibular ligament, the calcaneofibular ligament, and the posterior talofibular ligament are all injured as the foot slides inward.
Less often occurring sprains include syndesmotic sprains, which harm the tibiofibular ligaments, the ligaments that connect the two leg bones (the tibia and the fibula) right above the ankle, and medial ankle sprains, which affect the ligaments of the inner ankle. In particular, persistent ankle instability and repeated sprains are likely to result from syndesmotic sprains, which are most common in contact sports.
Sprained Ankle: Symptoms & Types
Symptoms are easily distinguishable as pain, swelling, pain while walking or putting weight on the injured foot, feeling of instability. But there are different types of ankle sprain that determine the way your treatment will be planned and amout of time it will take for you to recover.
Grade 1: Mild stretching and tiny ligament fiber tears; mild ankle bruising, edema, and pain; usually little discomfort when bearing weight; examination revealed no instability. Recovery time: 1-3 weeks.
Grade 2: Partial ligament tears; moderate ankle bruising, edema, and pain; a slight ache when exerting weight; examined little instability. Recovery time: 3-6 weeks
Grade 3: Total ligament rupture; significant ankle bruising, swelling, and tenderness; severe discomfort when carrying weight; on examination, there is significant instability. Recovery time: Several months.
RICE/ PRICE Methods Are Outdated
The RICE and PRICE methods have been famous as treatment options every time someone sprains their ankle. Unfortunately, this methods are still being used and advised today but I am here to tell you that they are outdated. Even the scientist who came up with the RICE term as being the best option for sprained ankles has taked back his claim.
This is due to icing and immobilization of the ankle joint. First, ice helps only with pain as it numbs neurons that send pain signals to the brain. Even if it can help a little bit with swelling it does not work in long runs. This is because we need that sweeling/ inflammation as it contains healing substances that our body produces naturally. So trying to lower swelling with ice will only prolong your recovery time.
Second, immobilization has also been preached as successful tool for those suffering from sprained ankle. Yes, it does make walking easier if your use bandage to stabilize the ankle but it takes away the needed movement. You need to move your ankle as much as possible so that new healing subtances can break through inflammation. This will cause all the accumulated waste in the area to be carried away and induce faster healing.
How To Treat Sprained Ankle The Right Way
Assessment
Your first step after spraining your ankle should be getting it checked out by a physiotherapist who can assess whether or not you need surgery on your ligaments or tendons.
The physical examination may hurt because of the swelling and inflammation, and it frequently includes:
Observation. The injured ankle will be examined by your physical therapist in comparison to your other ankle. Over the damaged ligaments, the sprained ankle frequently has swelling and bruises.
Palpation. Frequently, only the region right above the injured ligaments experiences tenderness. To identify the ligaments that are affected, your physical therapist will gently press around the ankle.
Measuring your range of motion. Your ankle might be moved in different directions by a physiotherapist, but a tight, swollen ankle might be challenging to move.
Stability evaluation. In order to evaluate the stability of the ankle joint, your physiotherapist may carefully move or pull your ankle in a number of different directions.
Then your physiotherapist will provide you with individualized treatment regime including mobility/cirulatory, strength, balance and plyometric exercises.
Mobility Training
Your physician or physical therapist will recommend range-of-motion or controlled motions of your ankle without resistance as a means of preventing stiffness. Mobility exercises should be started as soon as possible. They will not only prevent stiffness yet your recovery time will be shorter. This happens because motion and movement induces greater circulation and new blood with the healing properties to the area. Here follows a little sample of mobility exercises which you can perform.
Flexes
Lay the affected foot’s heel flat on the ground. As much as you can, draw your foot and toes close to your torso. Release. Then, point them as far away from the body as you can. Release. Repeat as frequently as you can during the first week.
Alphabet
Put your heel on the ground and use your big toe to write the capital letters of the alphabet as large as you can.
Standing Stretches
Place yourself with one arm’s length of the wall. With its toes pointed forward, place the damaged foot behind the other. Maintain a flat heel and a straight back knee. Slowly bending the front knee will cause the back leg’s calf to stretch. For 15 to 20 seconds, hold. three to five times.
Strength Training
Exercises to strengthen the muscles and tendons in the front and rear of your leg and ankle will be added to your treatment plan once the pain and swelling have subsided to a certain defree. It is okey to perform strength exercises if your pain doesn’t go over 5 on 0 to 10 scale, or couse too much of excess swelling.
If weight-bearing strengthening exercises like toe raising are too unpleasant, water exercises may be performed instead. Resistance-based exercises are added as tolerated. Here follows a little sample of strength exercises which you can perform.
Ankle Eversion
Sitting on the floor, carefully turn the damaged foot outward while holding an elastic rubberband around your uninjured foot. Repeat 15 times. As you progress hold your rubberband tighter or get a harder one.
Ankle Inversion
Cross your legs while seated on the ground, placing your wounded foot underneath. Turn the wounded foot inward gradually by wrapping an elastic rubberband around it and securing it around your uninjured foot. Repeat 15 times. As you progress hold your rubberband tighter or get a harder one.
Rises/ Toe Raises
Place your hands on the wall in front of you as you stand. Go up into a toe raise. After holding for one second, slowly return to the starting position. Repeat 15 times. As you gain strength, perform this exercise while only putting weight on the damaged side as you lower yourself. You can as well perform irregular toe raises first without and then with extra weight, holding a dumbbell or kettlebell.
Band Marches
Place a elastic band around your knees. Bend your knees a little and then march side to side while holding on tension in the elastic band. You will feel burning at the side of your hip/ butt, more precisly in gluteus medius muscle. Gluteus medius is a small muscle which plays a major part in your balance. The stronger it is the better balance you will have. Make the exercise harder by switching to a harder band or placing a band around your ankles or feet.
Towel Scrunches
Sit in a firm chair with a little towel on the floor in front of you. Take off your shoes and socks and carefully scrunch up the towel with your toes while counting to five. Release the towel after which repeat. Repeat this 12 times, or less if it hurts.
Balance & Plyometric Training
Ankle instability and recurrent sprains are frequently caused by poor balance. Standing on the affected foot with the opposite foot up and the eyes closed is a nice illustration of a balance exercise. During this phase of rehabilitation, balance boards are frequently utilized. Start simple and then make exercises harder. Here is a sample.
One Leg Balance
Lift your good leg behind you with your hands on a wall, counter, or chair back so that your weight is supported by the leg with the injured ankle. Hold this for 20 to 30 seconds if you can. As you gain strength, try performing the action alone using one or two fingers for support. Do this without clinging to anything when you’re stronger.
Later on you can perform this exercise with eyes closed, turning your trunk or head at different directions or standing on balance board/ foam cushion.
Half Squats On Balance Board
Carefully place both of your feet on the balance board. Now attempt to balance on the board or foam while slowly and deliberately performing 8–10 repetitions of slow, controlled half-squats. Increase gradually as you get more at ease. DO that by doing deeper squats or adding weight.
Balance board Ball Toss
Ask your partner or therapist keep throwing a little medicine ball that weighs 5 pounds your way while you’re balancing on a balance board or foam pad so that you can catch it while keeping your balance on the board. This can even be done with smaller tennis ball and catching more challenging throws.
Jump Rope/ Pogo Jump
Skipping rope is a great way to strengthen ligaments and muscles around your ankles. Keep your knees straight and let the jump/ motion come only from your feet and ankle. This will stiffent up your tendons around your ankle and make you more responsive. If you don’t know how to skip rope then perform this exercise without it and jump in place, pogo jumps.
Agility & Endurance Training
Other exercises, such agility drills, may be gradually added after you are pain-free. Running in figures of 8 that get increasingly smaller is great for improving agility and calf and ankle strength. Start performing short joggs, first in place, later on treadmill and eventually outdoors on uneven surfaces. You can start by performing interval jogging, 1 minut on and 1 minut off. Gradually increase to 2 min jogging, 1 off and so on. As you gain more stability and endurance you can try faster joggs, sprinting and running outdoors on uneven surfaces.
Conclusion
Sprained ankle is one of the most common injuries in our sociaty. Everybody can get effected by it, from office workers to professional athletes. In majority of cases the sprain won’t be serious but it will need time to heal. Always get you ankle checked by doctor or physical therapist so that you know exactly the severity of your injury. You will as well need to follow the rehabilitation program given to you. This will make your healing time shorter and give you back the strength you need to get back on track.